How to Start a Successful Blog in 2023: Expert Strategies

If you want to start a blog and turn it into a successful business, you’ve come to the correct spot. Whether you’re a new or seasoned blogger looking to expand your blog, there are several methods to get started. We have you covered whether your goal is to produce cash, build a loyal following, or fuel your passion.

In this post, we will walk you through the essential processes of starting and expanding your blog, to eventually turn it into a sustainable source of revenue and a source of online income. We’ll supply you with crucial information whether you want to be a full-time blogger, a part-time freelancer, or just want to start a blogging side hustle. We will be with you every step of the way, from specialty selection to smart monetization techniques. So, let’s get started!

What is a Blog?

what-is-a-blog-How-to-Start-a-Blogging BusinessBlogs are specialized websites or sections where people or organizations contribute articles on certain themes regularly. These themes may include personal experiences and perspectives, as well as news, reviews, and educational material. Blogs provide a flexible structure for creating material, including text, photographs, videos, and podcasts.

The name “blog” is derived from the words “web” and “log.” Initially, blogs were used as online diaries, allowing people to document their daily lives. They have, nevertheless, matured into useful sources of information, updates, and interactive platforms for both individuals and corporations.

Blogs, which are routinely updated web pages, give unique insights into a variety of issues. They are often updated on a daily, weekly, or monthly basis. Individuals, small enterprises, and major corporations may all operate blogs. Bloggers can earn money in a variety of ways, including advertising, sponsorships, affiliate marketing, and product or service sales.

They also provide a forum for people to express themselves, exchange their expertise, and interact with others who have similar interests. Furthermore, blogs may be used to generate money by promoting products and services, building customer connections, and establishing themselves as thought leaders.

What is a Website?

what-is-a-website-How-to-Start-a-Blogging BusinessPersonal blogs, company websites, e-commerce storefronts, and other uses are all possible with a website. A website is the foundation of your internet presence when beginning a blog. This allows you to successfully post content, connect with your audience, and market your company.

Websites exist in a variety of shapes and sizes, from simple static pages to complex dynamic sites with extensive capabilities. The website you choose for your blogging is determined by your goals, money, and technical ability.

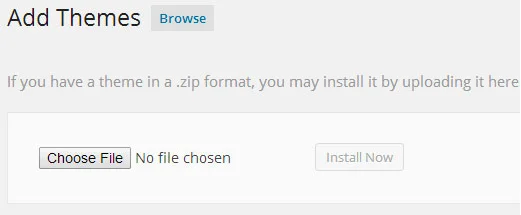
If you have little technical experience, setting up a WordPress blog may be the best option. WordPress is a popular content management system (CMS) that facilitates website construction and administration without requiring technical knowledge. It has a large number of themes and plugins that allow you to personalize the appearance of your site and include needed functions.

What is the difference between a Website and a Blog?

Blogs normally cover a single topic and are updated on a regular basis with articles or posts. They can take many different shapes, such as a frequently asked questions (FAQ) page or a visually appealing homepage design.

Website, on the other hand, is often separated into multiple pages, each providing a certain function. As a result, websites are more static than blogs since their pages are changed seldom rather than routinely.

It’s worth mentioning that many websites have internal blogs, while others exist completely as blogs with no other pages. This can occasionally cause misunderstanding. In such circumstances, blogs are frequently integrated within a larger website that provides extensive information, with the blog component being used to keep people informed and interested. For example, an online business may include a blog section that provides information on various items and how to use them.

Lastly, a blog is frequently the heart of a website, with the emphasis on giving good material rather than selling things or providing other types of information. You’ve probably seen instances of blogs on the internet, either as independent blogs or as parts inside websites.

How to Starting a Blog: A Video Instruction

If you’d rather see how we go about putting up a blog, this step-by-step tutorial video called ‘How to Become a Successful Blogger Today’ that walks you through the entire process. Proceed to reading if not.

The Easy Steps to Start a Blog and Making Money in 2023

This is the most in-depth tutorial on establishing a blog from scratch. Take a cup of coffee and read it all the way through, or skip forward to the step you need assistance with. To start a blog quickly, use the numbered instructions above as a cheat sheet.

01. Identify a Topic for your Blog

Writing an engaging blog article is one of the most important tasks in establishing your blog. The subject selection process is critical to blogging success. It influences not just the sort of readership you attract, but also the material you write and the overall outcome of your site.

The topic or specialty you pick will serve as the foundation for all subsequent initiatives on your site. It becomes the focus of your writing efforts and, hopefully, a source of cash. Almost every topic has an audience eager to be engaged.

However, it is vital to realize that certain themes outperform others. Your selected issue should have broad appeal while also striking a personal chord with you. It’s critical to achieve a balance between appealing to a broad audience and exploring a topic that truly fascinates and inspires you.

Do Some Research:

What’s your favorite topic? Is there anything you’re particularly fond of? If you are not enthusiastic about the subject, you will not write about it daily. Here are some suggestions to help you select the best topic:

  • Consider your knowledge and expertise: Consider the abilities and information you’ve gained throughout the years. This might include scholastic topics or practical skills like language or auto maintenance.
  • Investigate your present job: It might be a terrific source of inspiration for your blog. If you work in a specialized sector or business, you may offer your knowledge, experience, and skills.
  • Discover your interests and hobbies: Consider your interests and hobbies. These interests and passions, whether it’s reading books, creating a fantasy novel, or working on DIY projects, maybe wonderful blog themes.

Remember that choosing a topic about which you are really enthusiastic will make it easier and more pleasurable to write about it regularly.

Brainstorm Topics:

Let’s start by brainstorming things that you find intriguing or are knowledgeable about. Consider your interests, hobbies, and areas of competence. Here are a few suggestions to get you started:

  • Personal finance tips and budgeting strategies
  • Unforgettable travel destinations and adventurous experiences
  • Health and wellness tips for a balanced lifestyle
  • Delicious recipes and cooking techniques for food enthusiasts
  • Parenting advice and family dynamics discussions
  • Beauty and fashion trends for style-conscious individuals
  • Latest technology updates and gadget reviews
  • Home decor inspiration and organization hacks
  • Sports and fitness training tips for active individuals
  • Entertainment news, reviews, and insights into pop culture

Remember to select a topic in which you are interested or an expert. Consider the possible audience and monetization possibility as well. Before beginning research and validation, spend some time brainstorming and creating a detailed list of prospective themes.

Analyze Topics Research:

Once you’ve compiled a list of prospective blog subjects, the following step is to undertake an extensive study and analysis of each one to determine its feasibility. Here are some useful research techniques to get you started:

  • Look at the blogs: Examine existing blogs that address comparable subjects. Examine their content, target demographics, and monetization tactics. Determine what they do well and any holes in the market that you can address.
  • Use keyword research tools: To do keyword research, use tools such as Google AdWords Keyword Planner, Ubersuggest, or SEMrush. This will assist you in discovering appropriate terms, evaluating search traffic, and evaluating competitiveness.
  • Consider conducting surveys to collect useful information about your target audience. Surveys may help you learn about their wants, preferences, and pain spots, allowing you to personalize your material to their demands.
  • Keep up to speed with industry trends and changes by following influencers in your field and reading industry publications. This will allow you to spot new chances and stay ahead of the competition.

A thorough study can assist you in identifying themes with the best likelihood of success and worth pursuing. Remember to pick a topic that reflects your love and experience, as well as your ability to regularly generate high-quality content about it.

Determine Topic Viability:

The following important step is to validate such themes to establish their potential. Here are some pointers to help you efficiently validate your possible blog topics:

  • Check the search volume: Use keyword research tools to determine the search volume for keywords linked to your proposed themes. This will reveal whether there is enough demand for the issue and whether it is worthwhile to pursue.
  • Assess the competition: Investigate the competitiveness of keywords linked to your proposed themes. If the competition is fierce, ranking for certain keywords and attracting an audience may be difficult.
  • Examine the market for gaps: Examine other blogs in your field to find holes or areas that are not covered or underrepresented. If you discover subjects that are not fully handled, you have an opportunity to address them.
  • Consider the possibility of monetization: Consider the viability of monetizing your selected blog topic. Investigate affiliate programs, sponsorship possibilities, and goods you may produce and sell that are linked to your theme.

You may make educated selections and choose a topic that has the potential for success, connects with your passion, and matches your blogging goals by validating your prospective blog ideas. When picking, keep in mind to emphasize both demand and monetization potential.

Make a Niche Decision:

It is important to choose a niche for your blog after completing extensive research and validation. A niche is a discrete and particular region within a larger topic. This concentrated strategy allows you to stand out in a crowded market and attract the attention of certain consumers.

Consider the topic of health and well-being. You may concentrate your emphasis and build a specialty within this huge subject, such as vegetarianism or yoga. By selecting a specialty, you give your blog a distinct character and boost the possibility of gaining a dedicated and interested readership.

Choosing a specialization offers various benefits. For starters, it enables you to present yourself as an authority on a specific topic, therefore increasing credibility and trust among your audience. A niche also allows you to produce specialized and in-depth material that addresses your target audience’s unique requirements and interests.

Furthermore, choosing a specialty helps with SEO optimization since it helps search engines grasp the main focus of your site. By integrating relevant keywords related to your subject, you increase the exposure of your content in search engine rankings, resulting in organic traffic to your blog.

02. Pick Up a Good Domain Name

Your domain name is your brand name, and choosing one is one of the most important decisions you’ll make when beginning a blog. A domain name should be brief, memorable, and simple to remember. It is also critical to represent the topic or specialization of your site. Let’s start with your domain name.

What is a Domain Name and How does DNS work?

A domain name is a unique identifier for a website on the internet. It is the address that visitors enter into their web browsers to get to a certain website. Domain names are made up of two parts: the name itself (such as “example”) and the domain extension (such as “.com” or “.org”). They combine to form a distinctive and identifiable web address, such as “example.com.”

The Domain Name System (DNS) is critical to the operation of the Internet because it facilitates the translation of alphabetic domain names to numeric IP addresses. It works in the same way as a phone book does, by matching a person’s name to their phone number. A DNS query is launched when a user enters a web address (URL) into a browser.

Domain names, such as 152.5.4.3, are converted into IP addresses during the DNS resolution process. This conversion is required to find and access the website associated with the user’s specified web address, such as www.reckonerr.com. In this example, reckonerr.com is the domain name, while www Is the hostname.

DNS serves as a worldwide and open database name server network. It consists of 13 authoritative name servers, sometimes known as “root servers,” that serve at the DNS root zone level. Based on the exact TLD of the domain name being requested, the root server is responsible for forwarding a DNS query to a name server associated with the proper top-level domain (TLD).

TLDs such as.com ,.net, and.org are examples of TLDs. Requests for DNS records within the root zone are answered immediately, thanks to authoritative TLD name servers that can resolve IP addresses for associated domain names. These TLD name servers return the specified domain information.

Consideration when choosing Domain Name

It’s critical to create a distinctive and memorable brand name that reflects your specialization when establishing your blog. This name is appealing to your intended audience. Here are some recommendations to follow while selecting a domain name:

  • Keep it brief: Choose a name that is short and easy to remember. Longer names might be difficult for visitors to input correctly or remember later. Aim for 14 characters to guarantee readability and simplicity.
  • Select the appropriate domain extension: The most popular and memorable domain extensions are.com ,.org, and.net. These are well-known and liked by internet users.
  • Make sure the name is simple to say and spell: Select a name that is easy to spell and pronounce. Avoid using complicated or unique vocabulary that may confuse or irritate visitors.
  • Avoid digits and hyphens: Including numbers or hyphens in your domain name might make it difficult to type correctly.

If you’re having problems coming up with ideas or locating an available domain name, tools like Wordoid can help. Wordoid is an outstanding naming tool that generates recommendations for creative and memorable names. However, while Wordoid might inspire, it is not suggested that you acquire the domain straight from it.

Instead, try hosting services such as  Hostinger or BlueHost, which give free conditions for your blog. If you already have a registered domain elsewhere, they can assist you in transferring it easily throughout the setup process.

03. Setup your website with Web Hosting

A web host is in charge of making your website available on the internet. It gives the tools required to host your website and store its data on servers. To deliver your site’s content, Internet browsers connect with these servers. Your website cannot be made public unless it is hosted on the internet.

When choosing a web hosting service, it’s important to consider various factors. Understanding the concept and functioning of web hosting will help you make informed decisions for hosting your WordPress website.

setup-web-hosting-how web-hosting-works

How to setup website?

After you’ve settled on your specialty and domain name, the next step is to design your website utilizing website builders. You’ll need web hosting, which allows you to publish your website online by renting storage space that anybody with an internet connection may access. To begin, do the following steps to set up your website with web hosting:

  • Select a web hosting company: Examine several web hosting companies such as Bluehost, SiteGround, and HostGator. Compare their features and pricing options to locate one that meets your requirements and fits your budget.
  • Choose a hosting plan: Most providers provide shared, VPS, and dedicated hosting options. Although shared hosting is inexpensive, it may not be perfect for blogging. VPS hosting provides greater resources and freedom, while dedicated hosting provides maximum power and control.
  • Register your domain name: If you haven’t already, you may do it through your web hosting company or a separate domain registrar such as GoDaddy or Namecheap.
  • Install WordPress: WordPress is a popular content management system (CMS) that makes creating and managing blogs easier. To get started quickly, look for site hosting companies that provide one-click WordPress installations.
  • Create captivating material: Now that your website is up and running, it’s time to start creating quality content for your blog. Plan your content strategy and create blog entries, videos, or podcasts that your target audience will enjoy.

Take your time with this crucial step as a quality web host ensures fast-loading, and reliable performance without unexpected crashes. For new blogs, Bluehost is generally the recommended option, and we will use it in this tutorial.

04. Pick a Simple WordPress Theme

WordPress offers a wide range of themes that make it easy to change the look and feel of your website. Your chosen theme will serve as the foundation of your blog’s design, significantly influencing how your content is presented to your audience. In this step-by-step guide, we will assist you in selecting the perfect WordPress theme for your blog website.

Let’s begin by familiarizing yourself with the concept of a theme.

What is a WordPress Theme?

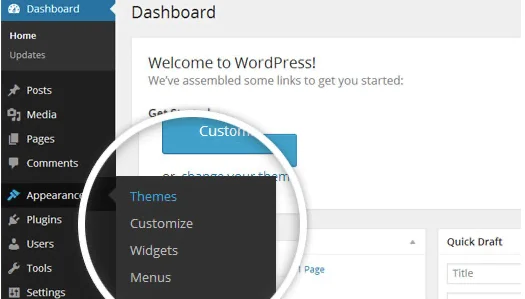
A WordPress theme is a pre-packaged design layout that determines how your website appears when users visit your URL. It is extremely important in deciding the overall appearance, feel, and style of your website. The theme you select determines how your website appears to users and shapes its overall appearance.

Every piece of content you upload to your website is presented inside the framework and design components of the WordPress theme. You may rapidly modify your WordPress site by simply changing the theme, giving it a new and updated design.

reckonerr-discription-with-logo

How to Add a WordPress Theme?

There are several ways to install WordPress themes on your website, such as using the theme directory, uploading the theme, or using the file transfer protocol (FTP). Installing from the theme directory or simply uploading the theme are the two most accessible approaches.

It is worth mentioning, however, that in some cases, installing via FTP is suggested. When working with bigger themes, custom themes, or when you are unable to access the WordPress dashboard, this option comes in handy. FTP enables for direct file transmission, which gives you more freedom and control over theme installation.

1. Navigate to Appearance> Themes

Select Themes within the Appearance option box on the left side of the dashboard.

wordpress-theme-download-dashboard

02. Select Add New at the Top of The Page

When you click the Add New button, you can choose from featured, famous, or latest themes.

How-to-Start-a-Blogging-Business-A-Step-by-Step-Guide-|-Reckonerr-

03. Installing a WordPress Theme using the Upload Method

You can easily upload a premium or custom theme from a third party using the WordPress dashboard by following these steps:

  1. Download the .zip file purchased from the theme marketplace or commercial provider.
  2. Navigate to Appearance> Themes. Then, log in to your WordPress account, go to Appearance in the menu on the left of the dashboard, and select Themes.
  3. On the themes page, select Add New at the top. When you click the Add New button, you can choose Upload themes.
  4.  Once you have selected Upload Theme, click Choose File. Click the Install Now button after selecting the theme .zip folder you downloaded.
How-to-Start-a-Blogging-Business-A-Step-by-Step-Guide-|-Reckonerr-
Once the process has been completed, click Activate.

You will receive a confirmation message showing the successful installation once you have picked and installed your desired theme. You may now go ahead and activate the theme.

By selecting the “Activate” button, your selected theme will be applied to your website, and the new theme design will become live. Your visitors will now interact with your website using the visual components and layout supplied by the active theme.

05. Install WordPress Plugins

With over 60,000 free WordPress plugins available for download, you have a plethora of alternatives to pick from based on the unique needs of your website. You may improve the operation of your website by adding plugins that are most appropriate for your needs. Whatever your aim, rest certain that there are plugins (or even a few) available to assist you in achieving it simply.

Why WordPress Plugins Are Essential for Your Website Success

They are one of the primary reasons WordPress is such a robust and adaptable website construction software. Whether or whether you wish to:

  • Improve the security and speed of your website.
  • Make your website search engine and social media friendly.
  • Make an online store or a membership website.
  • Include a contact form, a reservation system, or a forum.
  • Showcase photos, videos, or podcasts.
  • And much more

There is a plugin (or a few) that can assist you.

WordPress plugins are simple to set up, activate, and utilize. They do not require any coding or technological knowledge to utilize.

How to Add Plugins To WordPress

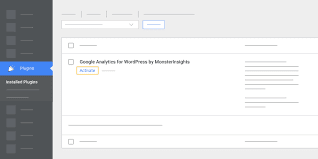
Here are three ways to install WordPress plugins, starting with the simplest: using the plugin search tool within your WordPress dashboard.

  1. Choose Plugins > Add New in your WordPress dashboard.
  2. The search bar in the top right corner can be used to find a plugin. You will see some results.
  3. In the results, click Install Now and then click on Active when you find the plugin. Click the plugin name to view more information.
How-to-Start-a-Blogging-Business-A-Step-by-Step-Guide-|-Reckonerr-

In the “Plugins > Installed Plugins” section, you have the option to activate or deactivate any plugin according to your needs.

We recommend following the video lesson given by Yoast SEO for extra assistance with installing plugins using this technique. It provides step-by-step instructions as well as important insights to help you navigate the process smoothly. Please see the guide for a more in-depth knowledge of how to install plugins using this technique.

06. Setup Google Analytics

Google Analytics is a sophisticated free tool for tracking and analyzing website traffic and data. You can improve your website by knowing how users engage with your content and which pages they visit. This article will assist you in configuring Google Analytics for your WordPress website using the user-friendly MonsterInsights plugin.

Setting Up Google Analytics with MonsterInsights Plugin

MonsterInsights is largely recognized as the best WordPress Google Analytics plugin. MonsterInsights makes it simple to link your WordPress website to Google Analytics. This gives you access to all important data from your WordPress dashboard. To get started, follow these simple steps to download and install the MonsterInsights plugin for WordPress:

  1. Go to your WordPress dashboard and navigate to “Plugins” » “Add New”.
  2. Click on the “Download Plugin” button.
  3. Once the plugin is downloaded, click on the “Activate Plugin” button to activate it.

MonsterInsights is now installed and operational on your WordPress site, allowing for smooth interaction with Universal Analytics and GA4. This connection guarantees that you can easily monitor and analyze the data that is most important to you.

How-to-Setup-google-analytics-A-Step-by-Step-Guide-|-Reckonerr-

Then go the Google Analytics to start. In the top right corner, you will find either a “Sign in to Analytics” link or a “Start for free” button. Click on the appropriate option.

By clicking on the “Sign in to Analytics” link or the “Start for free” button, you will initiate the process of setting up your Google Analytics account and gaining access to its powerful features.

How-to-Setup-google-analytics-A-Step-by-Step-Guide-|-Reckonerr-

After activating the MonsterInsights plugin, you will be guided through the setup wizard to configure the plugin settings. The wizard will automatically open to help you.

When you launch the setup wizard, you will be presented with the message “Welcome to MonsterInsights!” You can choose the category that best defines your website below. There are three alternatives available to you:

  • Business Website: Select this option if your website represents a business or company.
  • Publisher (blog): Choose this option if your website is primarily a blog or focuses on publishing content.
  • Ecommerce: If your website is an online store or includes eCommerce functionality, select this option.

Choose the category that best describes your website so that MonsterInsights can give you with the most appropriate tools and analytics monitoring for your unique requirements.

How-to-Setup-google-analytics-A-Step-by-Step-Guide-|-Reckonerr-

To retrieve your MonsterInsights license key, refer to the email receipt you received upon purchase. You can also access your account area on the MonsterInsights plugin website.

Once you have obtained your license key, proceed with the setup process as follows:

  1. In the setup wizard, enter your license key in the designated field. This step verifies your account.
  2. After entering the license key, click on ‘Connect to MonsterInsights’ to establish the connection.

In the next step, you will be prompted to add your Google Analytics account to MonsterInsights. Follow these steps:

  1. Select your Google Analytics account from the available options to authenticate the integration.
  2. Grant MonsterInsights the necessary access permissions to your Google Analytics account.

By completing these steps, you will successfully connect MonsterInsights to your Google Analytics account. This will enable the plugin to retrieve and display your website’s analytics data.

How-to-Setup-google-analytics-A-Step-by-Step-Guide-|-Reckonerr-

Once you have authenticated the connection with your Google Analytics account, the next step is to select a profile that corresponds to your website property. Follow these instructions:

  1. From the available options, choose the profile that accurately represents your website.
  2. After selecting the appropriate profile, click on ‘Complete Connection’ to finalize the connection between MonsterInsights and your chosen profile.

Following the completion of the connection, you will be given with recommended Google Analytics plugin settings. These options are intended to improve MonsterInsights’ functioning and tracking capabilities. Take the time to go over these suggested settings and make sure they match your tastes and goals for tracking website statistics.

How-to-Setup-google-analytics-A-Step-by-Step-Guide-|-Reckonerr-

File Download Tracking, The most commonly used file types (doc,exe,js,pdf,ppt,tgz,zip,xls) are included by default.

Please review and configure these recommended settings, then click the ‘Save and Continue buttons.

On the next screen, you’ll find choices for even more tracking options, add-ons, and helpful plugins.

How-to-Setup-google-analytics-A-Step-by-Step-Guide

Congratulations for successfully installing Google Analytics after finishing the setup procedure! A pop-up screen will appear with the words “Awesome; You’re All Set!” This means that your installation is now complete.

How-to-Setup-google-analytics-A-Step-by-Step-Guide-|-Reckonerr-

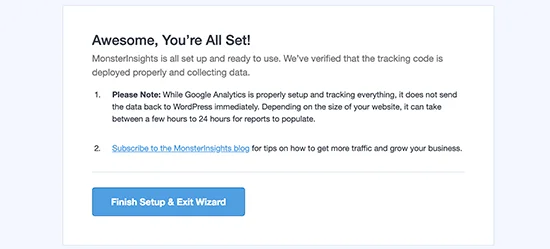
You can also see when you will be able to see your website reports on this screen. You can expect to wait between a few hours and 24 hours, depending on the size of your website. Don’t forget to click the ‘Finish Setup & Exit Wizard’ button.

You can watch this video tutorial from MonsterInsights for more help setting up Google Analytics with this method:

07. Set Up Google Search Console

Connecting your website to Google Search Console is a simple process, especially when using the Yoast SEO plugin. We highly recommend linking your site with Google Console as it provides valuable insights into your website’s performance. By using Search Console, you can identify effective strategies and pinpoint issues. The advice and recommendations you receive can be easily implemented, leading to improvements in your website’s overall performance.

Setting up your website to Google Search Console

To begin the optimization process, open your web browser and navigate to https://search.google.com/search-console/. Once there, locate and click on the prominent blue “Start now” button. If this is your initial encounter with Google Search Console, you will be prompted to sign in using your Google account. It is advisable to use the same Google account for accessing other services like Google Analytics.

Once you’ve reached the page, proceed by signing in using your Google or Gmail account credentials. After successfully logging in, you will be prompted to enter your website URL.

There are two methods to verify your website: domain name or URL prefix. We highly recommend the URL prefix method as it is a more straightforward process.

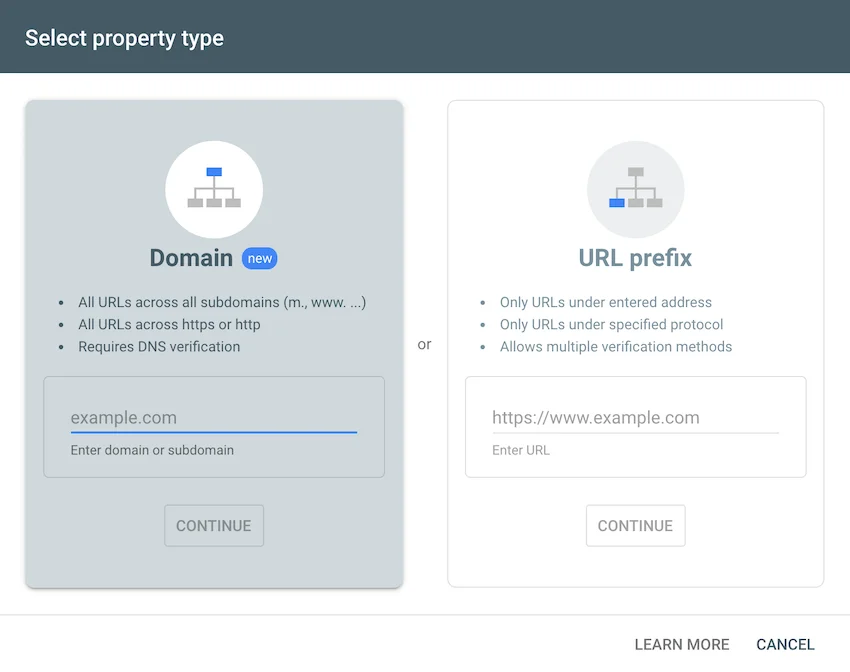
Please keep in mind that Google treats HTTP and HTTPS as distinct protocols and URLs like https://reckonerr.com and https://reckonerr.com are considered separate websites. Therefore, ensure that you enter the correct URL for your WordPress website.

Once you’ve input the right website URL into the Google Webmaster Tools setup procedure, click the ‘Continue’ option to move on to the next stage.

We have simplified the authentication procedure by requiring simply an authorization code to be pasted into Yoast SEO.

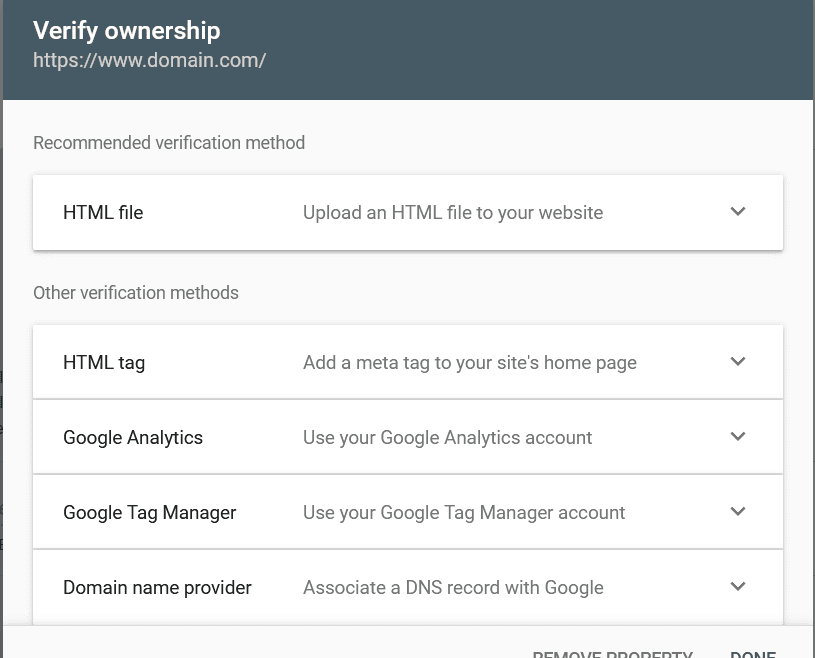
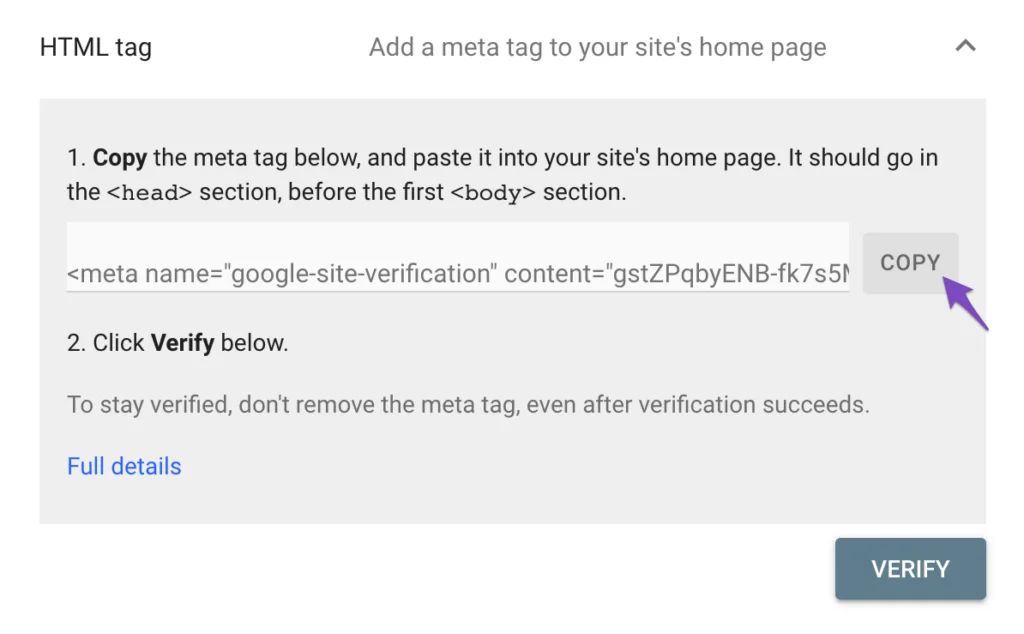
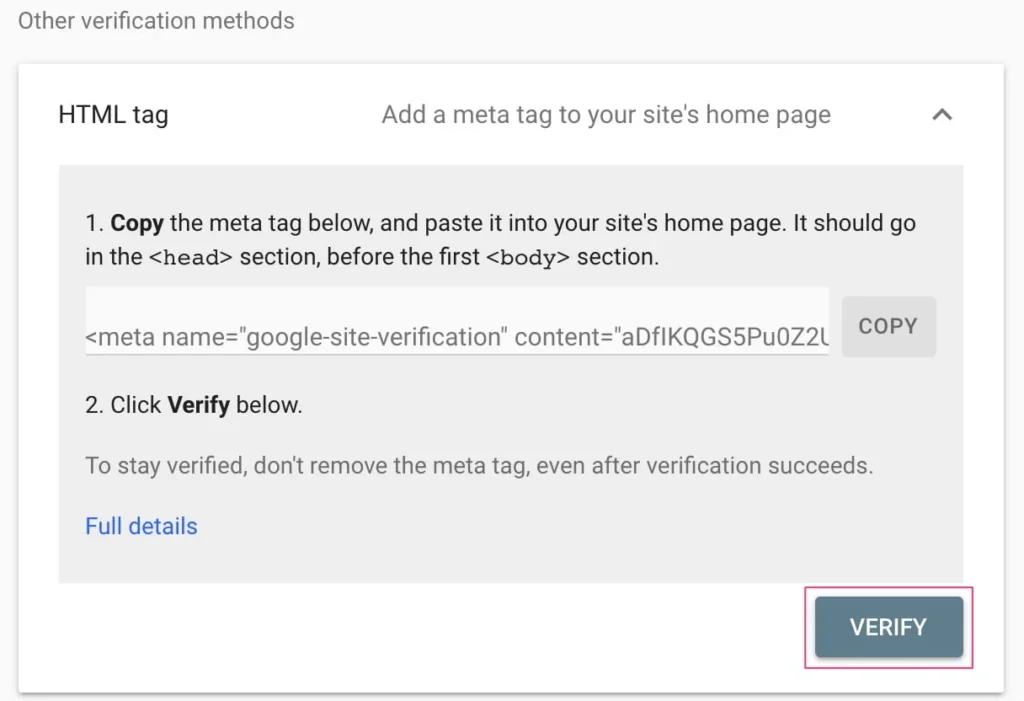
You will be prompted to authenticate your website ownership in the following step. Although there are other approaches available, we will illustrate the simplest utilizing HTML elements. Expand the HTML tag option and copy the code that appears.

To clarify, you can utilize a long line of characters in your website’s content for Google Search Console verification. Right-click on the highlighted tag and pick “Copy” from the menu. This will make it easier for you to insert the code into the right spot on your website.

You will then need to go to the WordPress dashboard, and follow these steps:

  1. Go to your WordPress dashboard.
  2. On the left-hand side of the page, you will find a menu. Click on the ‘SEO‘ option, provided by the Yoast SEO plugin.
  3. Once you’ve clicked on ‘SEO,’ a submenu will appear. Select the ‘General’ option from the submenu.
  4. By clicking on ‘General,’ you will be able to access additional configuration options and settings related to Yoast SEO.

Next, follow these instructions:

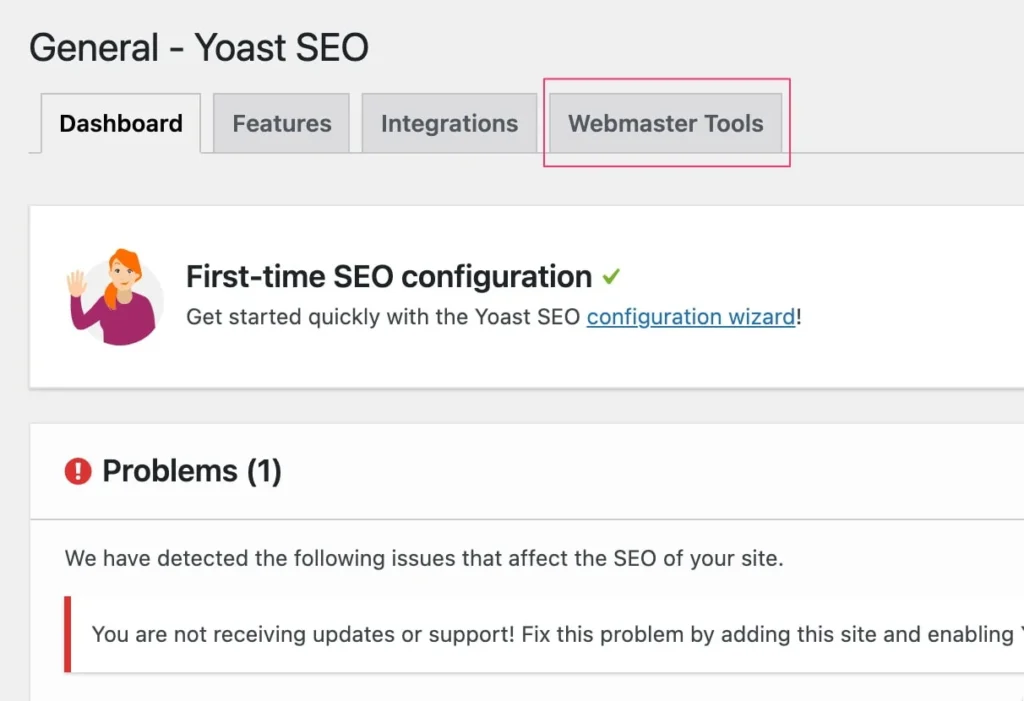
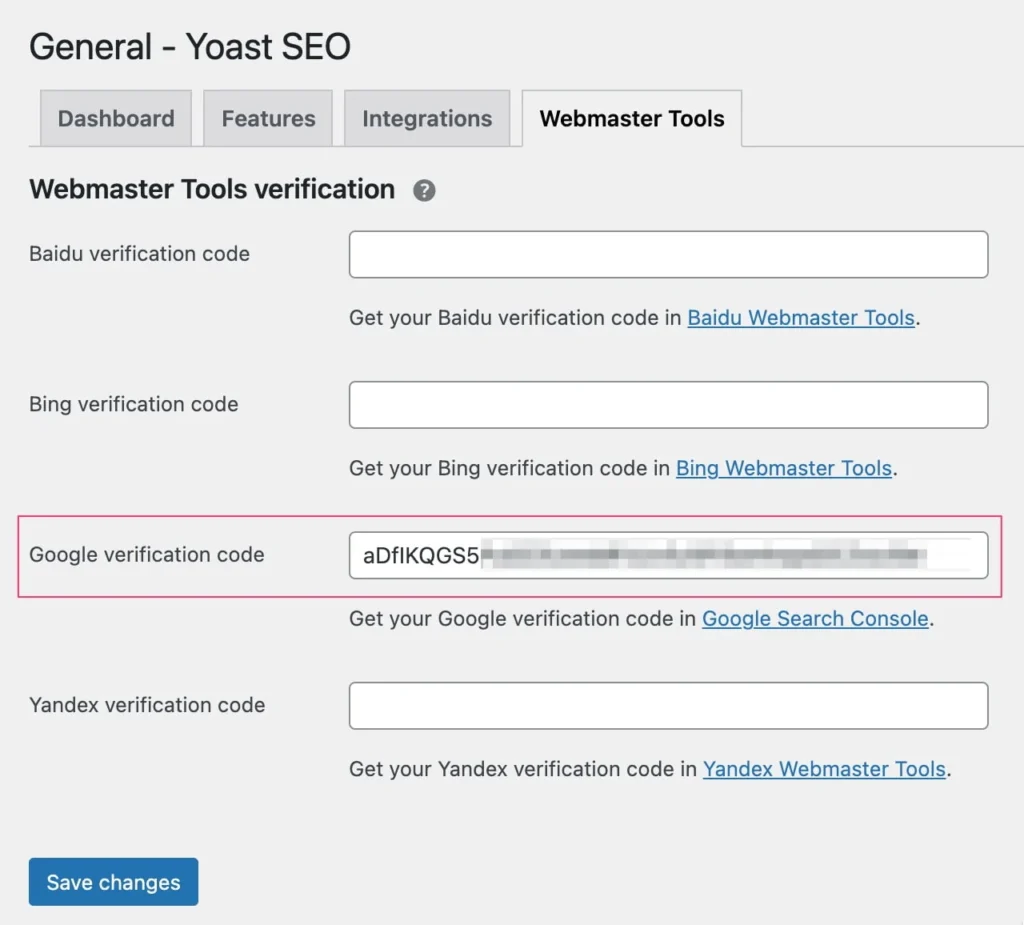
  1. Within the Yoast SEO settings, navigate to the ‘Webmaster Tools’ tab.
  2. On the ‘Webmaster Tools‘ tab, you will find fields where you need to enter verification codes for different webmaster tools.
  3. Fill out the appropriate fields for the webmaster tools you want to verify. The available options typically include Google, Baidu, Yandex, and Bing.
  4. Enter the respective verification codes in the corresponding fields to establish ownership and verification with each webmaster tool.
How-to-Start-a-Blogging-Business-A-Step-by-Step-Guide-|-Reckonerr-

To paste the verification code in the Google field, follow these steps:

  1. In the Yoast SEO ‘Webmaster Tools’ tab, locate the Google field.
  2. Paste the provided verification code into the Google field. Note that the code typically consists of random letters and numbers.
  3. After pasting the code, click on the ‘Save changes’ button to apply the updates. This will save the verification code in the Yoast SEO settings.

After saving the modifications in Yoast SEO, go to Google Search Console and finish the verification procedure. Within the Google Search Console interface, look for a ‘Verify’ option or button. The verification procedure begins when you click the ‘Verify’ button. Google will then determine if the verification code you added to your website meets their requirements. If the code is correctly matched, Google Search Console will verify your website.

Please note that the exact layout and wording may vary slightly depending on any updates or changes made by Google to their Search Console interface.

Excellent work! You have connected your website to Google Search Console successfully. You may now submit your sitemap after it has been verified and linked. This will allow Google to better grasp the structure of your website and index its pages.

Furthermore, Google Search Console provides a plethora of strong tools and operations in addition to sitemap submission. It delivers useful information on your website’s performance, search visibility, and potential problems. Take advantage of these features to monitor your site’s health, optimize its presence in search results, and uncover opportunities for improvement.

08. Make a Blogging Rhythm

Writing a blog article should be viewed as a long-term commitment rather than a one-time event. It takes persistence and perseverance, just like a multi-day camping journey. As a blogger, you must set a writing pace that you can sustain for years rather than months. Here are some common posting frequency guidelines:

  • Aim for at least once a week publication: Weekly content releases should be the minimal need. A word count of 2,000 is suggested for this post, which will serve as a good beginning point for your writing journey.
  • Regular bloggers often write two to three entries each week. Bloggers frequently raise their posting frequency to two or three times per week after establishing their routine. This enables more constant interaction with your audience.
  • Larger websites frequently write 5-7 blog articles every week. The number of weekly postings often increases as the size and viewership of a website grows. Multiple writers are required in such circumstances to maintain the desired posting frequency.
  • Some websites with a lot of material produce 25-50 posts every week. Certain sectors rely significantly on content marketing to attract new clients. In such instances, it is not unusual for a news or blog website to publish a large number of pieces every week in order to satisfy their marketing goals.
  • Posting will become more manageable and efficient with time and experience. The concept of writing many pieces every week may seem intimidating at first, but as you acquire expertise, your efficiency will increase. The idea is to start with good blogging practice by creating a weekly publication plan and progressively expand from there.

Building a successful blog requires consistency and effort. Accept the journey, stay committed to your writing goals, and watch your blog thrive.

Make a Weekly Posting Habit

Writing is undeniably a difficult task. Even seasoned bloggers can relate to the frustrations and challenges of the job. There were times throughout my three-month blogging stint that I felt compelled to chuck my MacBook out the window. Writing takes dedication and perseverance, and it is not for everyone.

Given the rigorous nature of writing, I recommend setting a modest goal of one article each week to begin. This method helps you to have a steady posting schedule while still making time for other important areas of your website. It gives me a much-needed break from writing blog pieces.

To maximize your time and efficiency, I recommend splitting the procedure down into two days. On the first day, devote as much time as possible to research, planning, and writing. This will be the first draft of your post. Focus on revising and finishing the material on the second day before uploading it to your WordPress platform.

Prioritize blog post quality above consistency. Make an effort to generate material that is more valuable than what is presently available in your category. You may differentiate your website and gain devoted readers by delivering relevant and unique information. This dedication to quality will help your site flourish and get attention.

09. Build Your Blog’s Audience

How can a blog become popular? A successful blogger understands that beginning a blog is difficult. You must get it started, solve numerous challenges, and keep consistent focus. Starting a blog takes a significant amount of time and work. There is no mistake about it: this is not for the faint of heart. The actions you must do are outlined below.

Listen To Your Audience:

Understanding what your audience wants is crucial for effective blogging. One method to gain insights is using platforms like Quora. By searching your primary keyword, you can discover the pressing questions people have. Incorporating relevant long-tail keyword phrases in your blog articles helps address user intent.

You may segment your audience based on their location in the sales funnel after you have a better understanding of them. This segmentation allows you to adapt your content and marketing techniques to engage and convert your audience more successfully.

Generate Content Ideas with a Topic Generator:

To create a viral post, it is important to understand the elements that contribute to the success of other posts. HubSpot’s Blog Ideas Generator is a valuable tool for this purpose. Simply enter your primary keyword into the search engine and click the search button.

By joining HubSpot, you will get immediate access to a week’s worth of free subject ideas, and at the end of the year, you will have access to a year’s worth of topic ideas. This tool can assist you in coming up with new and compelling content ideas that have the potential to go viral and reach a wider audience.

Generate Content Ideas from Answer The Public:

The utility of your material is an important component in persuading customers to share it. People are more inclined to share your content if they think it interesting and relevant to their requirements, resulting in greater traffic to your website.

As previously said, answering customers’ inquiries and providing them with what they require is critical. Understanding their inquiries and concerns allows you to produce material that not only answers their current questions but also addresses any new ones they may have.

Answer The Public is a tool that can help you discover numerous relevant topics based on your search query. It functions like Google’s autocomplete feature, providing insights into what users are searching for. By utilizing this tool, you can uncover relevant content ideas that align with your audience’s interests and questions. This will enhance the chances of your content being shared and drive more traffic to your website.

Use Comments to Generate Blog Ideas:

Engaging in blog comments may be a great way to get content ideas and engage with your followers. Reading comments has provided me with many useful content ideas over the years. It is critical to get comments from competent folks in your area to improve the quality of your future blog entries.

Visiting authority blogs is an effective method of discovering such comments. These blogs, such as the Moz Blog, often attract seasoned entrepreneurs, search engine optimization specialists, and content marketers who share valuable insights through their comments. Incorporating expert advice from these commenters into your posts can add credibility and provide valuable perspectives on your chosen topics.

Focus On Your Own Branding:

Brand consistency is vital for creating a unified and engaging experience for your readers. Your website should provide visitors a clear sense of what they may anticipate from your material, from the color scheme and graphics to the blog title. Aligning branding components with promoted content aids in the reinforcement of your brand identity.

If you want to attract a more affluent audience, you might pick a more polished theme for your website. This might include using components like serif typefaces, which portray a sense of wealth and refinement. These design decisions can help to create an aesthetic that is appealing to your target audience and delivers the intended brand image.

By keeping consistency between your brand and the content you promote, you create a strong and identifiable identity that fosters reader trust and a great user experience.

10. Monetize Your Blog

The prospect of converting your blog into an income generator for your organization may have attracted you to begin writing. However, you lack a clear plan to assure that it will be sustainable in the long run. Fortunately, there are various methods for monetizing corporate blogs.

We’ll go over various methods you can start monetizing your blog to produce a steady cash stream. You are unlikely to produce revenue quickly; achieving that aim will need consistent work.

Make Subscription-Based Content:

Subscription-based billing methods, such as Prime Video for video streaming or monthly software upgrades, are becoming increasingly popular.

When you first establish a blog, you may offer free content such as articles, infographics, and tutorials. If your blog and free material are of good quality, you may be able to boost traffic enough to justify putting up a barrier. As a consequence, premium members will be able to access unique content, professional advice, forums, videos, and other membership site perks. You might charge subscribers a one-time fee or have them pay on a regular basis.

Make Money With Advertisements:

You can sell advertising space if you don’t want to sell a physical product or service. The Google Adsense program allows anyone to place ads on their blog. Private ad placements on your site generate real money.

Even if they aren’t universally liked, online advertising are still around because they function. Google AdSense is used by over 2 million people worldwide to make online advertising money. Some of the capabilities provided by the service include the ability to block advertisements you don’t like, choose where they display on your website, and select which ads are appropriate for your site.

If you don’t want to be paid per click on Google-provided advertisements, you can charge advertisers a fixed amount for running ads. Purchasing advertising space on your website is one of the simplest methods to generate a full-time income from your blog. You might include a “Advertise Here” link on your blog, contact the firms directly, or utilize an advertising network.

Affiliate Programs:

Starting an affiliate program is a typical approach to earn money from your site. For instance, if you run a design blog, you may offer both digital and physical things linked to your business. Other designers may provide templates so that others may produce newsletters, business cards, and prints from the photographers and artists with whom you collaborate. If you drive enough traffic to your site, you could be able to earn a modest commission on each artist’s print you sell.

Affiliate marketing entails paying commissions to affiliates who promote or sell their items, with sales tracked and commissions calculated via tracking links. By compensating fashion-forward style influencers, a beauty supply firm may use an affiliate network to promote and sell its products. Affiliate marketing has grown to be a $12 billion business globally as a result of this passive income.

To monetize their blog traffic, content creators can work with affiliate networks, such as Amazon Associates, which provides millions of products they can use to market other businesses’ products. You can earn passive income once the affiliate program is set up for affiliate products. In addition, you may be able to find companies looking for affiliates to promote their brands or products.

Sponsored Posts/Reviews:

To generate money with sponsored posts and reviews on your site, you’ll need a lot of traffic and trust.

A blogger shares their opinion about a product in exchange for a fee in sponsored posts and reviews. As a consequence, the product is exposed to the blogger’s readership, and the company gains new consumers and publicity. When you think about influencer marketing, you probably think of the people you follow on Instagram and YouTube.

Influencer marketing, or publishing paid blog articles, is a hot trend right now. More than 63% of organizations want to increase their spending on influencer marketing this year.

Influencer marketing will be worth around $6.5 billion in 2019, up from approximately $3 billion in 2015.

When showcasing a product on your site, provide your honest assessment since losing your followers’ confidence is not worth it.

As an example, say you own a travel agency. Alternatively, you could invite a travel blogger to take one of your packages (at no expense to you) and report their experience whale watching by kayak in the Arctic.

Conclusion:

Starting a blog is an excellent way to express yourself, discuss your interests, and connect with people all over the world. If you want to start this wonderful blogging adventure without spending a fortune, here are 12 simple steps to do. You can enhance your blog’s influence and leave a lasting impression in the blogosphere by remaining consistent, providing high-quality content, and aggressively promoting it. Prepare to let your imagination run wild and make your mark!

Frequently Asked Questions:

What Should I Blog About?

The first step in starting a blog is to decide on a niche or topic. Consider your interests, expertise, and what you believe would be valuable to your audience. It’s important to choose a topic that you are passionate about and has the potential for growth.

How Often Should I Publish Blog Posts?

Consistency is key when it comes to blogging. Try to establish a regular publishing schedule, whether it’s once a week or several times a week. This helps you build a loyal readership and can improve your search engine ranking.

How Do I Monetize My Blog?

Several ways to monetize your blog include advertising, affiliate marketing, sponsored content, and selling your products or services. Choosing methods that align with your brand and provide value to your audience is important.

Do I Need To Be A Tech Expert To Start A Blog?

No, you don’t need to be a tech expert to start a blog. Many blogging platforms, such as WordPress and Squarespace, offer user-friendly interfaces that make it easy to create and publish content. However, it’s important to have a basic understanding of web design, SEO, and other technical aspects to optimize your blog’s performance.

How Long Does It Take To Start Earning Income From My Blog?

Earning income from your blog takes time and effort. It may take several months or even a year before you see significant earnings. It’s important to focus on creating valuable content and building your audience before you can monetize your blog effectively.

Scroll to Top